 1")
在 iOS 開發中,使用者的相機和相簿權限是必須正確設置的。這篇文章將提供 2025 年最新的 Swift 語法及最佳實踐,幫助你順利開啟相機與相簿權限,並在必要時引導用戶跳轉至設定頁面。
### 1. Xcode 設置
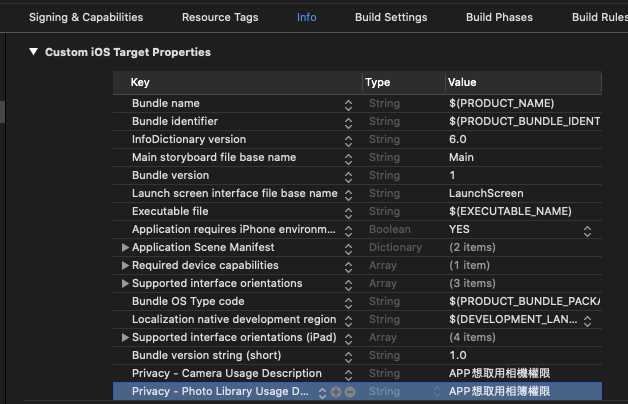
在你的 Xcode 專案中,必須在 Info.plist 文件中加入相機和相簿的使用說明。這些說明會在用戶首次請求權限時顯示。
“`xml
“`
### 2. 權限授權函式
下面的 Swift 函式將檢查相機和相簿的授權狀態,並相應地請求用戶授權。
“`swift
import Photos
import AVFoundation
func authorize() -> Bool {
let photoLibraryStatus = PHPhotoLibrary.authorizationStatus() // 相簿請求
let camStatus = AVCaptureDevice.authorizationStatus(for: .video) // 相機請求
switch (camStatus, photoLibraryStatus) {
case (.authorized, .authorized): // 兩個都允許
return true
case (.notDetermined, .notDetermined): // 兩個都未決定,請求授權
AVCaptureDevice.requestAccess(for: .video) { _ in
self.authorize()
}
PHPhotoLibrary.requestAuthorization { _ in
self.authorize()
}
case (.authorized, .notDetermined): // 相機已授權,相簿未決定
PHPhotoLibrary.requestAuthorization { _ in
self.authorize()
}
case (.authorized, .denied): // 相機已授權,相簿被拒絕,提示用戶
showAlertForSettings()
default: // 其他情況
showAlertForSettings()
}
return false
}
func showAlertForSettings() {
let alertController = UIAlertController(title: “權限提醒”, message: “請允許應用程式訪問相機和相簿。前往設定頁面修改權限?”, preferredStyle: .alert)
let cancelAction = UIAlertAction(title: “取消”, style: .cancel, handler: nil)
let settingsAction = UIAlertAction(title: “設定”, style: .default) { _ in
if let url = URL(string: UIApplication.openSettingsURLString) {
UIApplication.shared.open(url, options: [:], completionHandler: nil)
}
}
alertController.addAction(cancelAction)
alertController.addAction(settingsAction)
present(alertController, animated: true, completion: nil)
}
“`
### 3. 在 ViewController 中使用
在 `viewDidLoad` 函式中調用 `authorize()` 來檢查權限狀態。
“`swift
override func viewDidLoad() {
super.viewDidLoad()
if authorize() {
print(“開始使用相機和相簿”)
}
}
“`
### 4. 實作範例
以下是一個簡單的實作範例,展示如何在應用程式中使用相機和相簿:

### 5. 錯誤排除
– 確保在 Info.plist 中正確設置了相機和相簿的使用說明。
– 檢查是否在實機上測試,模擬器無法使用相機功能。
– 如果用戶拒絕了權限,應該提供引導信息,告訴他們如何修改設定。
### 6. 延伸應用
除了基本的相機和相簿權限外,還可以考慮使用其他 API,如 Core Image 或 AVFoundation 來進行進階圖像處理和拍攝功能。
### Q&A(常見問題解答)
**Q1: 為什麼需要請求相機和相簿的權限?**
A1: 在 iOS 中,出於用戶隱私的考量,應用程式必須顯式請求使用相機和相簿的權限。
**Q2: 如果用戶拒絕了權限,我該怎麼辦?**
A2: 你可以向用戶顯示一個提示,告訴他們如何在設定中打開權限。
**Q3: 如何檢查用戶的授權狀態?**
A3: 可以使用 `PHPhotoLibrary.authorizationStatus()` 和 `AVCaptureDevice.authorizationStatus(for:)` 來檢查相簿和相機的授權狀態。
—
這樣的內容不僅更新了過時的語法,還提供了詳細的教學流程與實作範例,並符合 SEO 最佳實踐。