https://cloud.linode.com/linodes/29998840
連線工具 iTerm
ssh root@198.123.52.34
ssh + 自己設定的password
進入虛擬主機,在 iTerm2 上輸入 ssh root@虛擬主機的 IP address
輸入剛剛在 Linode 設定的 Root Password
升級 ubuntu
sudo apt update && sudo apt upgrade
sudo apt-get install tasksel
安裝 LAMP
(舊版)
sudo tasksel install lamp-server
(新版 web server)
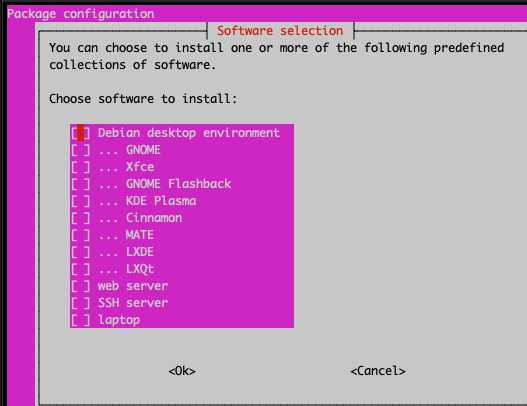
sudo tasksel
進入後空白勾選”web server”

設定Apache
apache2ctl configtest
vim /etc/apache2/apache2.conf 進入 vim 編輯器,在最上方加上 ServerName 虛擬主機的 IP address
sudo systemctl restart apache2 重啟Apache
設定防火牆
sudo ufw app list
sudo ufw app info “Apache Full”
sudo ufw allow in “Apache Full”
sudo ufw allow 21
sudo ufw allow 22
sudo ufw allow ssh
sudo ufw enable
關閉 Auto Index(如果文件中沒有 index 標題的檔案,會直接出現你的根目錄,要把這個功能關掉)
sudo a2dismod autoindex
sudo systemctl restart apache2
(新)
sudo apt install mysql-server
設定 MySQL 的 root 密碼
sudo mysql -u root mysql
SELECT user,authentication_string,plugin,host FROM mysql.user;
UPDATE user SET plugin=’mysql_native_password’ WHERE User=’root’;
SELECT user,authentication_string,plugin,host FROM mysql.user;
FLUSH PRIVILEGES;
exit
sudo mysql_secure_installation
y 2 符合強度要求的密碼 yyyyy…
以下審略
更改執行 index 檔案的順序
sudo vim /etc/apache2/mods-enabled/dir.conf
查看 php 詳細資料
PHP安裝(新)
sudo apt install php
apt-cache show php-cli
cd /var/www/html
sudo vim info.php
在網址輸入框中輸入 ip位置/info.php 即可看到詳細資訊
安裝 phpmyadmin
sudo apt install phpmyadmin php-mbstring
sudo phpenmod mbstring
sudo systemctl restart apache2
在網址輸入框中輸入 ip位置/phpmyadmin 即可登入 phpmyadmin
帳號為 root 密碼為第7步設定的MySQL密碼
允許使用 PHP Short tag
vim /etc/php/7.2/apache2/php.ini
找到 short_open_tag = 改成 ON
離開 vim 編輯器
建立LAMP
https://github.com/Lidemy/mentor-program-2nd-futianshen/issues/21
SSL auto
https://www.digitalocean.com/community/tutorials/how-to-secure-apache-with-let-s-encrypt-on-ubuntu-20-04
wordpress:
SQL
mysql -u root -p
CREATE DATABASE wordpress_bitneeds_db;
外掛無法裝問題
chown -R www-data:www-data ../html
wordpress 永久連結無法改問題
https://diary.taskinghouse.com/posts/664222-resolved-wordpress-permalinks-404-error/
https://www.itread01.com/content/1548349208.html
DNS設定 網域設定
godaddy 設定
https://tw.godaddy.com/help/add-a-subdomain-4080
/etc/apache2/sites-available
000-default-le-ssl.conf
(這個新增路徑)
000-default.conf
新增 網路.conf
重啟
sudo service apache2 restart
錯誤
Errors were encountered while processing:
mysql-server-8.0
E: Sub-process /usr/bin/dpkg returned an error code (1)
解法
cd /var/lib/dpkg/info
sudo rm -rf ./mysql-*
sudo dpkg –remove –force-remove-reinstreq mysql-server-8.0
sudo apt install libapache2-mod-php php-mysql
安裝wordpress
cd /var/www/html
wget https://github.com/WordPress/WordPress/archive/refs/heads/master.zip
apt install unzip
unzip master.zip
mv WordPress-master/* ./
rm -r WordPress-master
wget https://tw.wordpress.org/wordpress-6.1.1-zh_TW.zip
unzip wordpress-6.1.1-zh_TW.zip
rm -r wordpress-6.1.1-zh_TW.zip
mv wordpress/* ./
rm -r wordpress
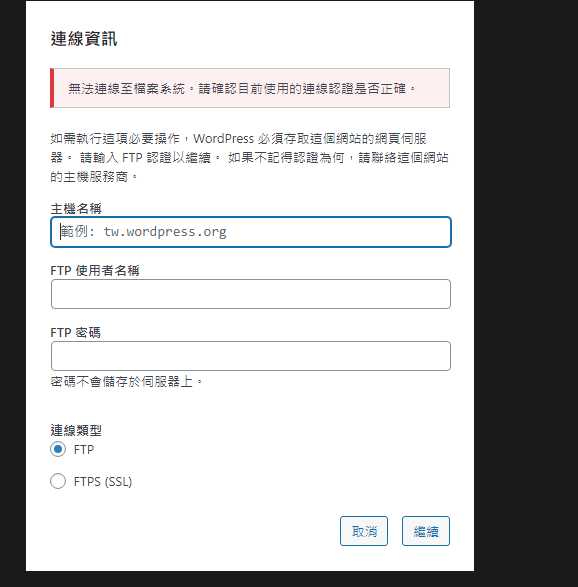
WordPress安裝外掛時,顯示無法連線至檔案系統的錯誤訊息:「如需執行這項必要操作, WordPress必須存取這個網站的網頁伺服器。請輸入 FTP認證以繼續。如不記得認證為何,請聯絡這個網站的主機服務商。」
chown -R www-data:www-data /var/www/html/wp-content/
chown -R www-data:www-data /var/www/html/wp-includes/
wp-config.php
define(‘FS_METHOD’, ‘direct’);
http://127.0.0.1/index.php/category/中文/
中文分類找不到
html/index.php加入
_SERVER[‘REQUEST_URI’] = urldecode(_SERVER[‘REQUEST_URI’]);
