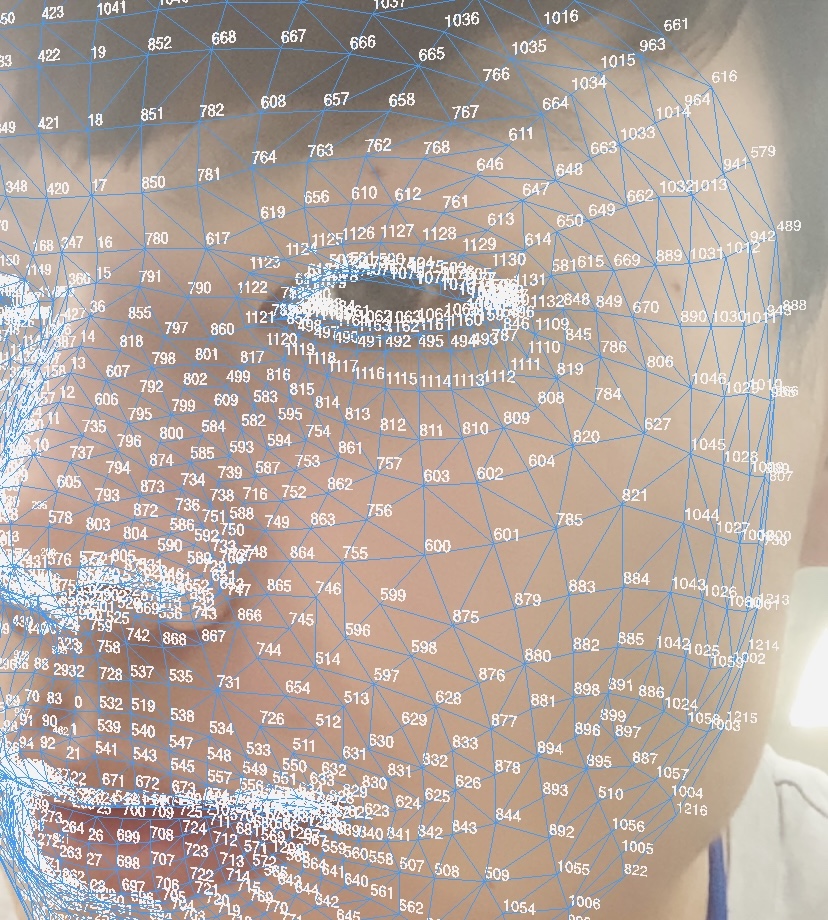
“`html
Swift ARKit 臉部特效:2025 最新教學與實作範例
簡介
ARKit 是蘋果公司推出的一套增強現實框架,允許開發者在 iOS 應用中創建驚人且互動性強的 AR 體驗。在這篇文章中,我們將深入探討如何使用 Swift 和 ARKit 創建臉部特效。此教學將涵蓋基本設置、實作範例以及常見錯誤排除,幫助你快速上手。
基本設置
新增 ARSCNView
override func viewDidLoad() {
    super.viewDidLoad()
    sceneView = ARSCNView()
    sceneView.frame = CGRect(x: 0, y: 0, width: self.view.frame.width, height: self.view.frame.height)
    sceneView.delegate = self
    sceneView.showsStatistics = true
    self.view.addSubview(sceneView)

    guard ARFaceTrackingConfiguration.isSupported else {
        fatalError("Face tracking is not supported on this device")
    }
}
啟動與暫停 AR Session
// 進入時開始執行
override func viewWillAppear(_ animated: Bool) {
    super.viewWillAppear(animated)
    let configuration = ARFaceTrackingConfiguration()
    sceneView.session.run(configuration)
}

// 退出時暫停
override func viewWillDisappear(_ animated: Bool) {
    super.viewWillDisappear(animated)
    sceneView.session.pause()
}
ARSCNViewDelegate 實作
// 設置 node
func renderer(_ renderer: SCNSceneRenderer, nodeFor anchor: ARAnchor) -> SCNNode? {
    let faceMesh = ARSCNFaceGeometry(device: sceneView.device!)
    let node = SCNNode(geometry: faceMesh)
    return node
}
表情偵測與 BlendShapes
透過 BlendShapes,我們可以偵測使用者的臉部表情並做出相應的反應。
// 偵測張嘴
func expression(anchor: ARFaceAnchor) {
    let jawOpen = anchor.blendShapes[.jawOpen]
    if jawOpen?.decimalValue ?? 0.0 > 0.1 {
        DispatchQueue.main.async {
            self.view.showToast(text: "張嘴巴")
        }
    }
}
臉部矛點定位與更新
func renderer(_ renderer: SCNSceneRenderer, didUpdate node: SCNNode, for anchor: ARAnchor) {
    if let faceAnchor = anchor as? ARFaceAnchor, let faceGeometry = node.geometry as? ARSCNFaceGeometry {
        faceGeometry.update(from: faceAnchor.geometry)
        expression(anchor: faceAnchor)
    }
}
臉部特效
在這一部分,我們將學習如何為臉部添加不同的特效,例如鼻子、眼睛和帽子。
let noseOptions = ["nose_1", "nose_2", "nose_3", "nose_4"]
let eyeOptions = ["eye_1", "eye_2", "eye_3"]
let mouthOptions = ["mouth_1", "mouth_2", "mouth_3", "mouth_4"]
let hatOptions = ["hat_1", "hat_2", "hat_3", "hat_4"]
let features = ["nose", "leftEye", "rightEye", "mouth", "hat"]
更新特效位置
func updateFeatures(for node: SCNNode, using anchor: ARFaceAnchor) {
    for (feature, indices) in zip(features, featureIndices) {
        let child = node.childNode(withName: feature, recursively: false) as? ImageNode
        let vertices = indices.map { anchor.geometry.vertices[$0] }
        child?.updatePosition(for: vertices)
    }
}
搖頭/點頭偵測
var isLeft = false
var isRight = false
var isUp = false
var isDown = false

// 檢查搖頭
func checkShakingHead() {
    if isLeft && isRight {
        DispatchQueue.main.async {
            self.view.showToast(text: "搖頭成立")
        }
        isLeft = false
        isRight = false
    }
}

// 檢查點頭
func checkNod() {
    if isUp && isDown {
        DispatchQueue.main.async {
            self.view.showToast(text: "點頭成立")
        }
        isUp = false
        isDown = false
    }
}
結論
透過這篇教學,你應該能夠使用 Swift 和 ARKit 創建基本的臉部特效。隨著你對 ARKit 的深入了解,你可以嘗試更多的創新和實驗,為使用者提供更豐富的互動體驗。
Q&A(常見問題解答)
1. ARKit 是否支持所有 iOS 設備?
ARKit 目前僅支持具備 A9 處理器及以上的設備,建議檢查你的設備規格。
2. 如何處理 ARKit 中的錯誤?
在開發過程中,常見的錯誤包括配置不支持、相機權限問題等。請檢查你的 Info.plist 文件,確保已授予相機使用權限。
3. 我可以在 ARKit 中使用自定義模型嗎?
是的,ARKit 支持使用自定義的 3D 模型,你可以將其導入並在 AR 環境中顯示。
專案下載: Github
參考文件: AR Face Tracking Tutorial for iOS: Getting Started
更多關於 Swift 的文章請查看以下連結:
“`
—
